Table of Contents
1. Lesson 04: Paint program
1.1. Getting set up
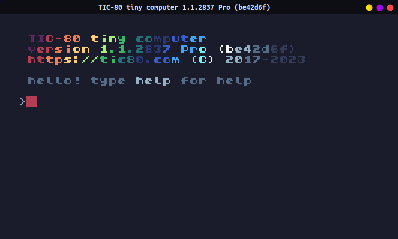
You can either edit over your existing code, or start a new program. If you want to start a new program, press ESCAPE until you get to the main prompt:
Then type in new lua, hit ENTER, then save NAME2.LUA, hit
ENTER.
> new lua
new cart has been created

> save Moose2.lua
cart Moose2.lua saved!
–
1.2. Draw your "brush!"
From this screen, press the F2 key on the keyboard. This will take you to the sprite editor.
In the image grid on the right side, click on the very first square - it's a blank square.
Next, choose a color from the palette at the bottom.
Finally, draw in the canvas on the left. You can leave it a filled-in color or add a design. This will be your brush for our little paint program!
![]()
1.3. Editing the code
Press the F1 key to go to the code editor. If you started a new project, it's going to have that starter code again. You can erase it and replace it with this instead:
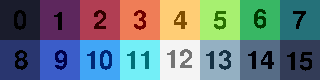
cls(13)
function TIC()

end
Remember that you can use the cls command to set the background
color, which uses a number code:
Next, we're going to tell our game to pay attention to where the
mouse is - get its x, y coordinates, and if the mouse button is
clicked. To do this, we use the mouse function like this:
mouse()https://github.com/nesbox/TIC-80/wiki/mouse
We can get information about the mouse and store it in some variables like this:
x, y, button = mouse()A variable is a name we create where we can store information like text, numbers, or the answer to "yes/no" questions. In our code,
x,y, andbuttonare variables! These values can change (or vary) over time!spr( id, x, y )https://github.com/nesbox/TIC-80/wiki/spr
Remember that the
sprfunction takes in theidof the sprite we want (in this case, it will be 0!) and the (x,y) coordinate to draw to. We're going to take thexandyvariables that store the mouse's current location and draw our sprite there!
Our drawing code will look like this:
cls(13)
function TIC()
  x, y, button = mouse()
  if button then
    spr( 0, x, y )
  end
end
1.4. Run the program
Once you have your code, you can run the program by pressing the
run button  or pressing CTRL+R.
Once you want to go back to your code, press ESCAPE then use the F1 key to go back to the code, or F2 key to go back to the sprite editor.
1.5. Save your work
Make sure to press the CTRL+S key, or press ESC to go to the
prompt and type save to save your work! If you want to access the
folder with your code, type folder.
If you have a USB flash drive, make sure to copy your file over so you don't lose it when the computer resets!